Showing posts with label organizing. Show all posts

Monday, August 23, 2010

How I use the workbox method with Charlotte Mason

Last year I read about Sue Patrick's Workbox System and was eager to try it. I could understand how it would help my children to become more independent with their school day, but when I investigated the Internet for people who used the method, much of what I read was speaking of children that were a little younger than mine (3rd and 5th grades last year.)

This post will tell how we adapted the system to work for us, and to work with the Charlotte Mason approach that we try to follow.

First, let me just recommend that you not look at my instructions as a basis of the system. I do several things differently. If you are really interested in this approach, please purchase the eBook and read it. (It's not too long.) It is available instantly through a download, so you can get started quickly. Then you can adapt to your own needs. Sometimes I will mention items that are in the book without explaining, but if you search for other bloggers who are doing workboxes, you will probably see pictures of what I'm talking about.

After reading the eBook, I began to realize that some of the concepts, such as repetition, would not exactly mesh with Miss Mason's philosophy. I also do not put "fun" things in my workboxes, as I want to allow my children the pleasure of getting their work done so that they can choose afterward what will be done for fun. I don't think Ms. Patrick's way is wrong, but I just want to do things differently than that.

Our workboxes are really not boxes at all. We use clear poly envelopes which are found at office supply stores. They take up less space and are more suited for our books than a plastic shoebox. They are more than $1.00 a piece, but that was the most expensive part of our system. The envelopes are durable, and though once in a while one will be destroyed, most of ours lasted through last year and are being used again. They can be repaired fairly well with clear packing tape. This year, we have rules for taking better care of our envelopes!


Each child has a milkcrate-like container. I already had a couple of these that I have used for years for other purposes, so those were free for me.

I use calendar numbers (use link or Google it) to number the envelopes. These are attached with Velcro dots so they can be removed. I laminated mine to make them more durable. Each envelope has a loopy dot of Velcro and the numbers have the hook side. I used self-adhesive dots and scratched the plastic a bit with sandpaper in one spot to try to get the adhesive to stick better. I will call them box numbers after this, but use the term "calendar numbers" when you search.

Each day, I slip the books for the day into the envelopes. If we are using the same book two days in a row, I leave it in the folder, and change the number if needed. I add anything needed to complete the assignment, such as pencil and paper, or math items. Usually science equipment doesn't fit, so that will be laid out where the demonstration will be performed (i.e. kitchen or bathroom.)

I use small Post-its attached to the book to write the specific assignment for the day. Usually it will be page numbers to read. If needed, I will add notes such as, "Read this with Mom," and so on. I put this either on the cover of the book or use it for a bookmark.


I arrange both boxes at the same time, hoping to prevent a bottleneck situation where both kids need my help at the same time. I also space assignments out so that items that require handwriting are not back-to-back. Once they are in the box the way they need to be, I use the box numbers to label them. The kids pick each envelope up in order and return it to the back of the box when they are finished. (The workbox book suggests that the child have a separate box in which to place the completed work, but my kids found it confusing and it cluttered up our space. That may be because they are older, and they find it motivating just to see the numbers climb higher and higher towards the end.)

Our family does not do a number strip on which to place the box numbers. I will add more on that later.

We do have a bit of time at the beginning of the school day to do any of our work that is done together, such as reading the Bible, composer and art study, Spanish, and Shakespeare . The workboxes are for individual work, and they come after our group work. Handicrafts, music practice, free reading, playing, and nature study happen mostly in the afternoon, and are not scheduled in workboxes.

This post is getting a bit long, so I will close it and add more tomorrow about how we take better care of our envelopes, and more detail about how we use these.

Thursday, February 12, 2009

Frugal Friday: Organizer boxes

When I was organizing my over-the-dryer cabinet a few months ago, I needed a little box in which to store some cleaning pads. I didn't have time to run to the store, and I wasn't sure they would have one as small as I needed anyway.

So I took an empty cardboard box and made one. I covered it with some decorative Con-tact® paper to make it look nicer and make it stronger. It turned out very nice, and I saved the money and time I would have had to spend finding the perfect box.

The other day, I decided that it would be better if the sides of the box were a bit taller. As I used and re-used the pads, they didn't want to stand up anymore, so I needed the box to support them so they wouldn't fall out and mess up my system! So I made a new one and took pictures this time. Here is what I did:


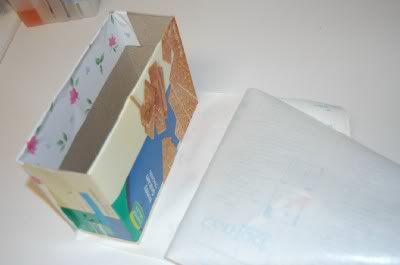
First, I cut one side off the box for my opening.

Then I taped the original opening closed. I'm just using a small piece of tape, because my box is getting very light duty.

I cut a piece of Con-tact® paper the size to wrap the box on two sides and the bottom, and overlap the edges a bit.

Then I peeled the backing away little by little, adhering it to the box. It's not perfect, but this isn't going to the State Fair. *grin* I also cut a second piece of paper to wrap around four sides of the box, this time missing the box bottom.

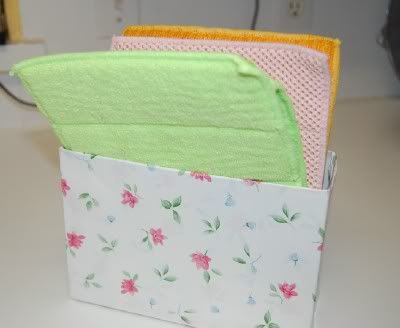
Here is the finished box, now holding my cleaning pads. (These are microfiber cleaning pads from FullerBrush, a gift from my mom.)

A couple of helpful hints: The sticky paper is not necessary, but it does help the boxes look nicer and keeps them sturdy. I could have instead used wrapping paper for looks, and reinforced the edges with packing tape. I have tried an off-brand of sticky paper that is supposed to act like Con-tact® paper, but it is more difficult to use, so I don't mind investing in a bit of the real thing. *smile*

The great thing about this project is that when I found that I needed a different box a few months later, I didn't have to go far to find a new one. It is really versatile, and if I re-organize later on, I just need to save a few boxes and I will have my own nearly free system ready!

Wednesday, September 5, 2007

Bookshelf cleanout

It gives me a lift just to see it looking orderly.

Before we started school this year, we had moved furniture around so that I could use both of my livingroom bookshelves for the school area. Everything had been moved into them, but I didn't really have a good system yet, and it wasn't organized. I had everything handy, it just didn't look right.

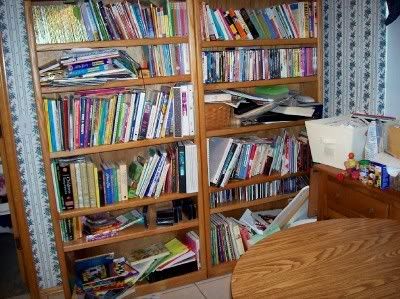
Monday I got some time to clean out the shelves and put things back nice and tidy. I started off with this:


Most of my shelves are adjustable. The shelf that is about 1/3 of the way up from the bottom is stationary, and it is very sturdy. That is a good place to put heavy, hardback books. The adjustable shelves are decent, but they are held up by little brass pegs, so they are fine for paperbacks and smaller books.

I do not have a system for classifying my books, really. That is why it works well for me to just arrange them by size. It really does look nicer that way. I just divided them up into heavy vs. lightweight books. The "grown-up" books are on the right side bookshelf, and the books we use for school are on the left side. It works out that most of the books I pull in and out during a regular day are on the same shelf.

I have found that it does look neater to pull all the books out to the front of the shelf, even if they are narrow and can be pushed back. That way the spines are all even. That is easier said than done, so I wait until I am putting things back at the end of the school day. That seems like a lot of trouble, but it is a little thing that makes a huge difference in the way the shelf looks.


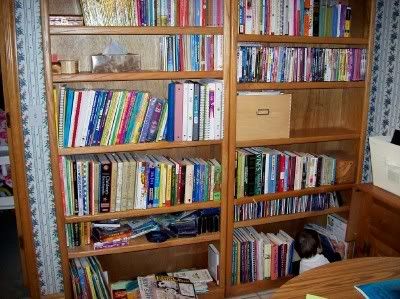
Here is a picture of what it looked like three hours later. Three hours, but I didn't work on it the whole time, since I had a baby to take care of!


If you look closely at the lower right corner, you will see my little helper checking it out. Get out of there, you little mess!

There is one little part that needs to be finished. The kids DVDs and CDs are still out of order, and they might need to be moved. The DVDs are pretty secure from baby brother, but the CDs fall right out of the cases when he gets a hold of them!

Our school area is part of the kitchen, and it is very visible to the rest of the living area of the house. It gives me a lift just to see it looking orderly.